 ultimate-guide
How to Soundproof Home Theater Walls, Doors & More
Table of Contents
- Why Soundproofing Matters for Your Home Theater Experience
- What You'll Need to Soundproof Home Theater Spaces
- Soundproofing vs. Acoustic Treatment: Know the Difference
- Step 1: Decouple Walls and Ceilings
- Step 2: Add Mass with Double Drywall and Mass Loaded Vinyl for Home Theater
- Step 3: How to Seal Door Gaps for Soundproofing
- Step 4: Address Flanking Paths and Penetrations
- Common Soundproofing Mistakes to Avoid
- Finishing Your Soundproof Home Theater Project
- Frequently Asked Questions
Last Updated: September 7, 2026
Why Soundproofing Matters for Your Home Theater Experience
The difference between a good home theater and a truly immersive one often comes down to what you cannot see. A 410-watt surround system pushing crisp dialog through dedicated channels loses its impact when half the audio leaks into the hallway or rattles the windows in the next room. Soundproofing is the invisible layer that keeps the energy where it belongs.
Blocking sound does more than protect your movie nights. It protects your family's sleep schedule, your neighbors' patience, and the resale value of a properly finished bonus room. The good news is that you do not need to rebuild your entire house. A focused approach targeting walls, doors, and structural gaps delivers most of the benefit.
What You'll Need to Soundproof Home Theater Spaces
Before you pick up a hammer, understand the core principle: soundproof home theater construction relies on adding mass, breaking vibration paths, and sealing every air leak. You are not trying to absorb echo; you are trying to stop energy from traveling through the structure.
Essential Materials for Sound Isolation
Gather these core supplies before you start:
- Resilient channels or sound isolation clips for decoupling
- Mass loaded vinyl (MLV) for adding density to existing assemblies
- Acoustic sealant (not standard caulk) for filling gaps
- Mineral wool or fiberglass insulation rated for sound attenuation
- Double layers of drywall with a damping compound between them
- Door sweeps and gasket seals for the entry point
Soundproofing vs. Acoustic Treatment: Know the Difference
Soundproofing is the process of preventing sound energy from entering or leaving a room. Acoustic treatment is the process of controlling how sound behaves inside that room. The two are frequently confused, but they solve entirely different problems.
If your neighbor can hear your action sequences, you need soundproofing. If your room sounds hollow or echoes during quiet dialog scenes, you need absorption panels and bass traps. Most home theater guides skip this distinction, which leads homeowners to hang foam on the walls and wonder why the sound still travels.
Foam panels do almost nothing to stop sound transmission. They absorb high-frequency reflections inside the room, which improves clarity, but they lack the mass to block airborne noise. For blocking sound, you need density and separation. For improving sound quality, you need absorption and diffusion. Plan for both, but purchase them separately with a clear purpose in mind.
Step 1: Decouple Walls and Ceilings
Decoupling is the single most effective technique for stopping structural vibration. Sound travels through solid connections like a train on rails. When you break those connections, the vibration has nowhere to go.
The process involves attaching resilient channels horizontally to your wall studs, then screwing your drywall into the channels instead of the studs. This creates a spring-like separation between the two sides of the wall. The U.S. Department of Energy's building science guidance confirms that breaking the rigid path between structural elements is fundamental to controlling noise in residential construction.
For ceilings, sound isolation clips paired with hat channels offer superior performance. The clips attach to the joists, and the channels snap into the clips, suspending the new ceiling independent of the structure above.
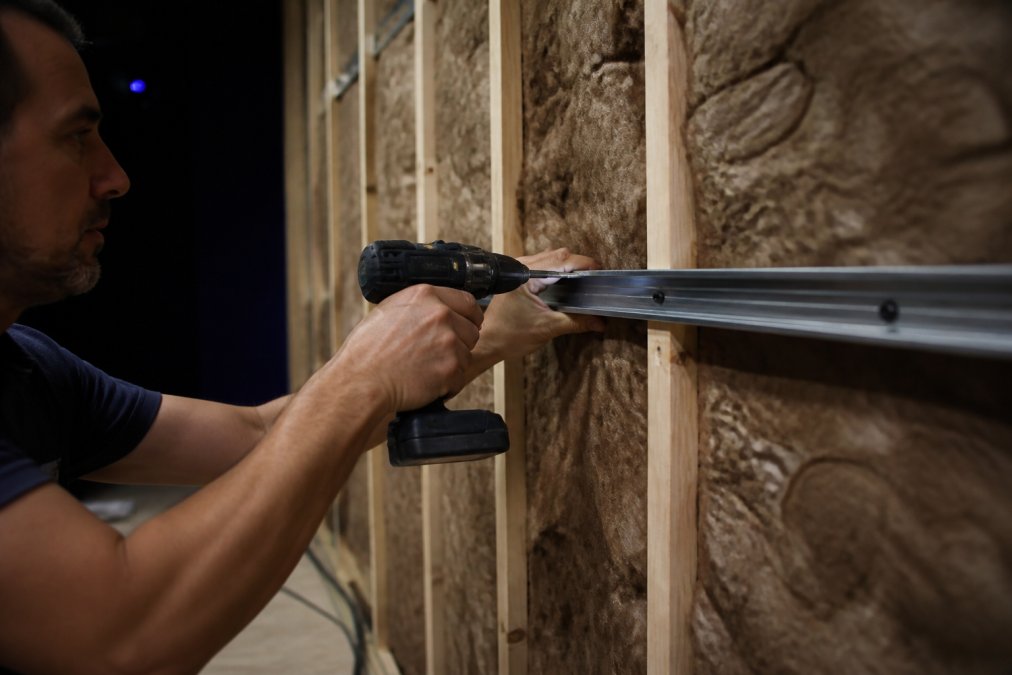
A common mistake is installing resilient channels on both sides of the same stud, which can create a rigid bypass. Install channels on one side only, and leave a small gap between drywall panels and the floor or adjacent walls, filling that gap with acoustic sealant.
Step 2: Add Mass with Double Drywall and Mass Loaded Vinyl for Home Theater
Decoupling stops vibration from traveling, but it does little to stop airborne noise like voices or loud sound effects. Mass loaded vinyl for home theater applications solves this by adding significant weight to your wall assembly without consuming floor space.
MLV is a dense, flexible barrier that you staple or screw between layers of your wall build-up. It is most effective when installed as a continuous layer with seams overlapped by several inches.
For maximum performance, use the double-drywall method: hang your first layer of drywall, apply a bead of damping compound like Green Glue across the entire surface, then hang the second layer. The compound converts vibrational energy into heat, dramatically improving your wall's Sound Transmission Class (STC) rating. This approach is budget-conscious for a dedicated theater room.
Step 3: How to Seal Door Gaps for Soundproofing
The door is almost always the weakest point in a soundproofed room. A solid wall with an STC rating above 50 can be rendered useless by a standard hollow-core door with a quarter-inch gap at the bottom.

How to seal door gaps for soundproofing starts with replacing any hollow-core door with a solid-core model. A solid wood door adds substantial mass, and the difference is immediately audible. Next, install an automatic door bottom that drops a rubber seal when the door closes, covering the gap at the threshold.
Add perimeter gasket seals around the door frame to compress against the door edge when closed. Finally, apply acoustic sealant to any gaps between the door frame and the rough opening in the wall. This combination stops the majority of flanking leakage.
Step 4: Address Flanking Paths and Penetrations
Flanking paths are indirect routes that sound uses to bypass your soundproofing. Common culprits include HVAC ducts, electrical outlets, recessed lighting, and plumbing chases. Sound behaves like water: it finds every crack and follows it.
For electrical outlets on shared walls, use putty pads behind the outlet boxes and seal the gaps around the boxes with acoustic caulk. Recessed lighting cans in a ceiling below a second story are notorious sound leaks; replace them with airtight, IC-rated fixtures or avoid them entirely in your theater ceiling.
Seal every penetration where wires, cables, or pipes pass through your walls. Standard fire-blocking foam is not sufficient for sound. Use a non-hardening acoustic sealant that stays flexible, preventing future cracks from building vibration. Guidance on sound control in multi-family construction highlights that attention to these small details is what separates effective assemblies from ineffective ones.
Common Soundproofing Mistakes to Avoid
The most expensive mistake is installing acoustic foam panels expecting them to block sound. Foam absorbs, it does not block. The second most common error is sealing the room so tightly that it becomes a pressure trap, which can cause doors to stick and HVAC systems to struggle. Ensure your theater has a dedicated return air path that is lined with acoustic duct insulation.
Another frequent issue is forgetting the structural load. Double drywall, MLV, and a decoupled ceiling add significant weight. A standard ceiling joist system may not be designed for an additional layer of drywall plus mass loaded vinyl. The International Code Council's residential structural guidelines recommends verifying your framing can handle the added load before installation.
| Mistake | Why It Fails | The Correct Fix |
|---|---|---|
| Using foam panels for isolation | Foam lacks mass to block transmission | Use MLV and double drywall |
| Sealing all air gaps completely | Creates pressure and HVAC issues | Add lined return air duct |
| Ignoring structural load | Risks sagging ceiling or wall failure | Consult a structural engineer |
| Soundproofing only one wall | Sound escapes through ceiling and floor | Treat all six surfaces |
The Hidden Cost of DIY: When to Call a Professional
Most guides assume you will swing the hammer yourself, but the math changes when you factor in your time, tool rentals, and the cost of fixing a mistake. A full decoupling and double-drywall project for a 12x14-foot room typically spans 40 to 60 hours of labor for a first-timer.
The real question is not whether the contractor is expensive; it is whether your DIY result will match the performance you expect.
Here is a practical framework for deciding:
- Hire a pro if: your ceiling has recessed lighting, you have a multi-story room, or your floor joists are undersized for the added load. These conditions require structural judgment that a weekend warrior rarely has.
- DIY if: you are working on a single wall, you have a helper, and you have already completed a drywall project successfully. Start with a single wall and measure the result before committing to the full room.
- Hybrid approach: Do the demolition, insulation, and sealing yourself, then hire a pro for the drywall hanging and finishing. This saves roughly 30% of the total cost while ensuring the final surface is flat and the seams are invisible.
Finishing Your Soundproof Home Theater Project
A properly executed soundproof home theater build transforms your viewing experience from a simple movie night into a private cinema event. The construction phase requires patience, but the result is a room where a whisper is audible and an explosion does not shake the entire house.
When you are ready to furnish the space, focus on the final layer: seating and speaker placement. A power reclining sectional with an integrated sound system can complement your acoustic work by positioning audio precisely where you sit. Browse the Retreat Elite collection to find theater seating that matches the scale and comfort level your new room deserves.

Get started with Retreat Elite and turn your newly quiet space into the destination your home was meant to have.
Frequently Asked Questions
What is the difference between soundproofing and acoustic treatment?
Soundproofing stops sound from entering or leaving a room by adding mass and decoupling surfaces. Acoustic treatment improves the sound quality inside the room by controlling echoes and reflections with panels and bass traps. For a true home theater experience, you need both: soundproofing to keep noise in, and acoustic treatment to ensure dialogue and effects sound clear and precise.
How do I soundproof a home theater room on a budget?
Start with the most impactful, low-cost fixes. Install door sweeps and gasket seals to close air gaps, which are major sources of sound leakage. Use heavy curtains over windows and place thick rugs on hard floors to dampen reflections. These steps reduce noise transfer significantly without a major renovation. You can add mass loaded vinyl and double drywall later as your budget allows.
Does mass loaded vinyl (MLV) work for home theater soundproofing?
Mass loaded vinyl is one of the most effective materials for adding mass to a wall or ceiling. It is dense and flexible, which helps block airborne noise like voices and movie dialogue. Install it between layers of drywall or over existing walls before adding a final layer. For best results, use MLV in combination with decoupling clips and acoustic sealant to prevent sound from bypassing the barrier.
How can I effectively soundproof my home theater doors?
The gap under a door is a primary source of sound leakage. Install an automatic door sweep that drops down to seal the gap when the door closes. Add foam gasket seals around the perimeter of the door frame to stop air and noise from passing through. If you have a hollow core door, consider replacing it with a solid core door for noticeably better sound isolation.